
Everybody knows how to send a Figma link, but did you know you can make Figma links that point directly to individual frames, pages or elements in your design? Master these skills to get streamlined feedback and showcase your work like a pro.
Why should you master Figma link sharing?
Check out some of these real-world scenarios where knowing how to leverage the Figma URL scheme can improve your workflow.
- Design Reviews: Share links to specific frames or components to keep stakeholder feedback focused and avoid distractions.
- Prototyping: Direct testers to specific screens or flows in prototypes during UXR to ensure they start at the right place.
- Documentation: Embed URLs in tools like Notion or Confluence to reference designs in PRDs or engineering handoff docs.
- Developer Handoff: Provide engineers with precise links to components, assets, and interactive prototypes.
- Cross-Team Collaboration: Sharing with marketing or product teams for quick access to assets that may still be in development.
- Design System Maintenance: Link reusable components in your design system documentation for easy updates for future iteration.
- QA and Testing: Include URLs in bug reports or testing workflows to allow developers to compare live builds against final designs.
- Onboarding: Guide new team members through key areas of your files using targeted links.
- Stakeholder Presentations: Share links during meetings or in follow-ups for deeper exploration of designs.
Decoding Figma URLs
Each part of the URL serves a specific purpose, so it’s important to understand the basic structure.
It’s also important to know that each part of the structure is separated by typical URL delimiters: ‘?’, ‘/’, and ‘&’.
Let’s take a look at a common example
Example URL:
https://www.figma.com/design/gmKcEcoWJS2UciWM7l63As/Your-File?node-id=1-2&t=V9sauZx9aVqSe0hj-0
- Base URL:
https://www.figma.com/design/
This tells the user (and your web browser) that this is a design file, rather than a FigJam or Slides file, and that it is hosted on Figma.com. - File ID:
gmKcEcoWJS2UciWM7l63As
This part of the URL identifies the file itself and is a coded identifier for the file. Figma uses this ID to locate and open the corresponding file. - File Name:
Your-File
Fairly self-explanatory. This is the name you gave your Figma file. - Node Parameter:
node-id=9-40069
This is the secret sauce of a Figma URL. The node parameter specifies which part of the file (a specific frame, component, or layer) you are being directed to. It corresponds to a single specific object in the Figma file’s structure. - Timestamp Parameter:
sDXzcU4Qh5pNhpQp-0
If applicable, the timestamp parameter might control playback timing for prototypes. You can safely ignore this for most use cases, but it’s helpful when referencing specific times in recorded prototypes.
How to create and share specific Figma links
Once you’ve mastered the URL structure, you’re ready to start using this powerful feature, just:
- Select the specific frame, component, or layer you want to reference.
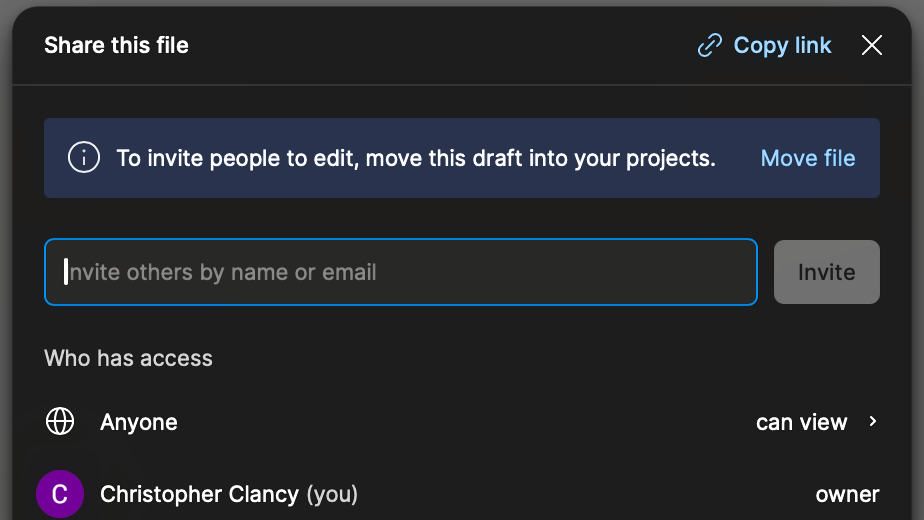
- Choose the Share button in the upper right-hand corner of the screen.
- Then click Copy link.
That’s it! Now you can share that link with anyone who has at least ‘View’ access privileges to the file. When they click the link, they’ll be taken directly to the specific object.
Things to avoid when sharing Figma links
Moving elements between pages
- Node IDs are page-specific: If you move an object to a different page, its
node-idwill change, and any existing links to that object will break. Figma always generates a newnode-idfor the element on the new page. - Moving items on the same page: Moving an element around on the same page does not affect its
node-id, so links will remain valid. - What to do if you move an element: Best case is just don’t do this. But if you must move an element, be sure to provide a new link for your collaborators—especially if the original link was used in evergreen documents like project briefs or trackers.
Choose elements wisely
- When you share a Figma link, the canvas automatically zooms to fit the selected node (e.g., frame, layer, or object). This happens regardless of your zoom level when creating the link.
- To show all elements on the canvas in a single view (not zoomed) you’ll need to deselect everything before you copy your link.
Are custom zoom levels supported?
- As of now Figma URLs do not support embedding specific zoom levels. Users will need to manually adjust their zoom after opening the link.
- Be intentional about what you select (or don’t select) when creating links to ensure they load as expected.
Embedded zoom levels could be coming in a future release, but until then your best bet is to be intentional about what you have selected (or not selected) when creating share links.
Your turn to master Figma links!
Figma URLs aren’t just links—they’re a practical tool for enabling smooth collaboration and gathering feedback. Whether you’re working on massive design systems or quick prototypes, mastering this feature can save you time, reduce friction and keep your team focused.
Got your own tips or tricks for sharing designs? Drop them in the comments—I’d love to hear how you’re using Figma URLs to level up your workflow.